The App Marketplace is where you find apps that outside developers have built for OneBooks — for payments, payroll, inventory, reporting and more — and install them into your business. OneBooks reviews every app before it’s listed. An app’s code never runs inside OneBooks’ own application: it runs on the developer’s servers, in a sandboxed frame in your browser or, for hosted automations, in an isolated sandbox — and it can only read or change what its permissions, and your own role, allow. See Apps, security and privacy.
Before you start
Section titled “Before you start”- Anyone who can sign in to your business can browse the marketplace and read listings.
- Installing, uninstalling and reviewing apps needs the
integrations.managepermission, listed under Integrations in Settings → Users & Permissions. Owners and admins have it by default; anyone else sees Ask an admin to install this app. on a listing. - Seeing Installed apps and using the apps your business has installed needs
integrations.read, which every role has by default. See Users, roles and permissions. - Installing an app is free on every OneBooks plan, including Free. An app may charge for its own service — see Pricing labels below.
Browse and search
Section titled “Browse and search”Open Apps → Marketplace. You can also get there with Browse marketplace on Apps → Installed apps, from the Looking for more apps? banner at the top of Apps → Integrations, or from the command palette (⌘K / Ctrl+K). The marketplace lists only the apps offered in your business’s country, and shows each app’s text in your language when the developer provides it — otherwise in English.
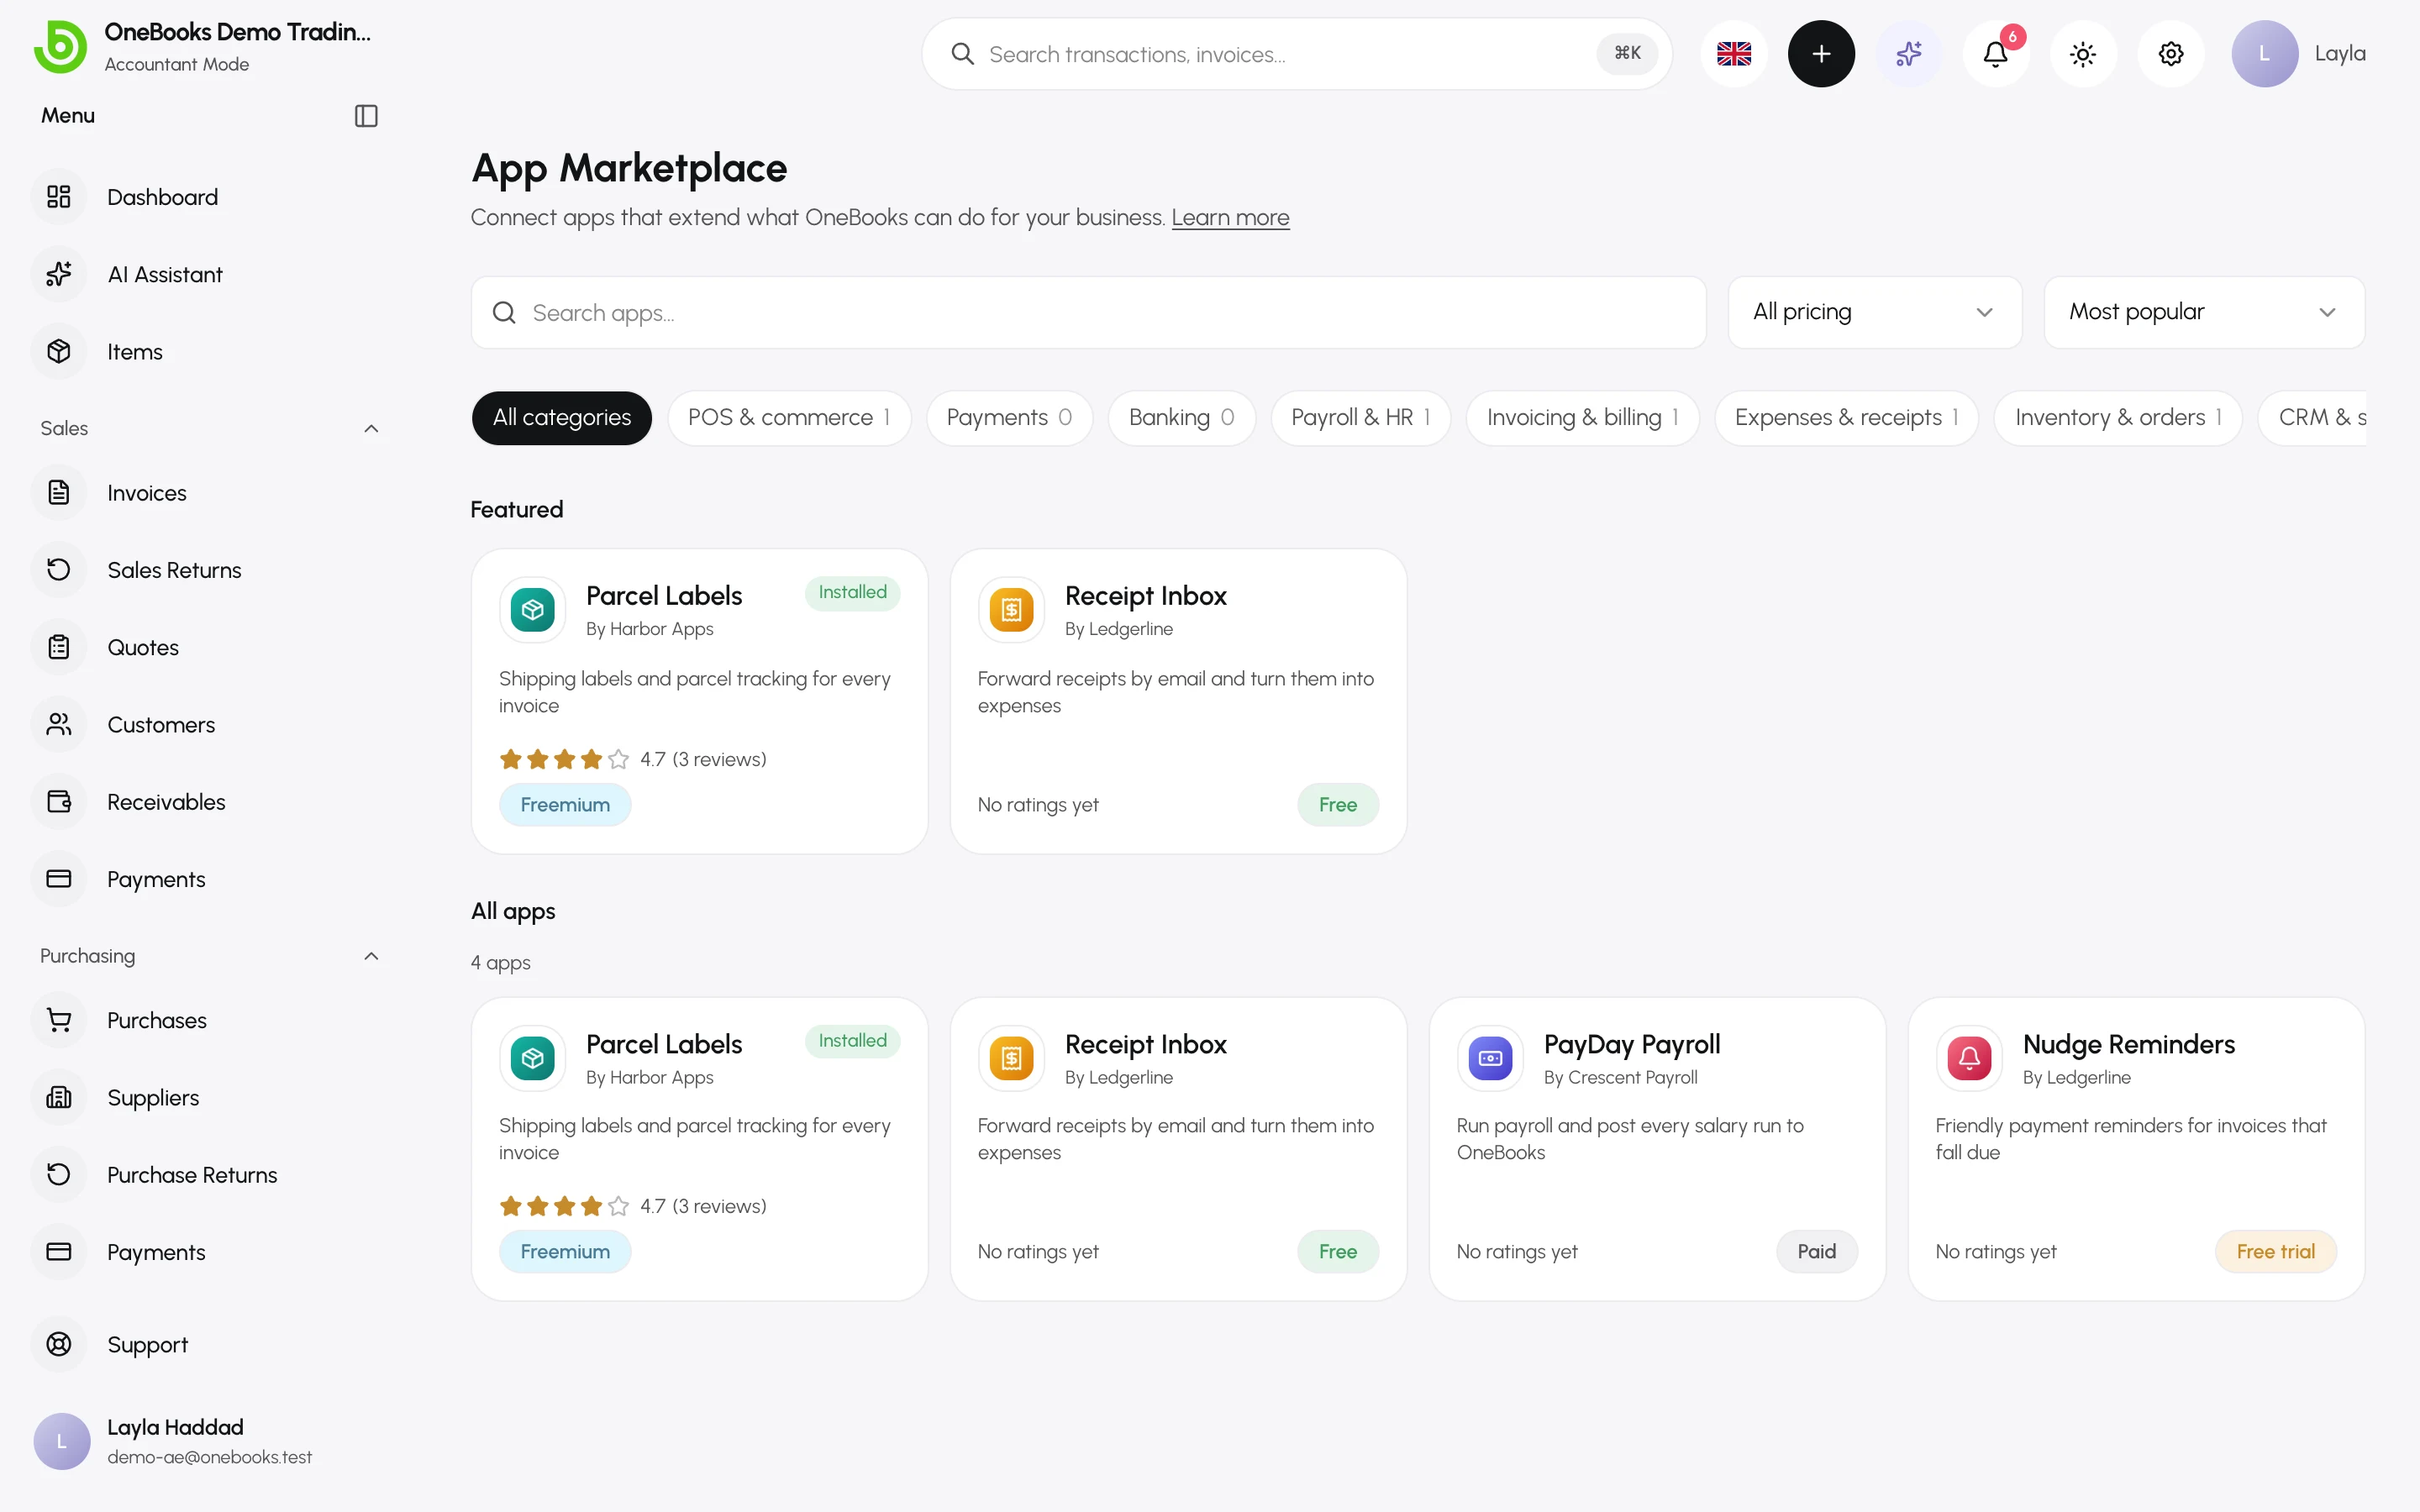
Each card shows the app’s icon and name, By and the developer, a short description, its star rating and a pricing label. Apps your business already has carry an Installed tag.
Search, filter and sort
Section titled “Search, filter and sort”- Search apps… matches an app’s name and short description, in your language and in English.
- Category chips narrow the list: All categories, then one chip — showing how many apps it holds, which may be 0 — for each of the 14 categories: POS & commerce, Payments, Banking, Payroll & HR, Invoicing & billing, Expenses & receipts, Inventory & orders, CRM & sales, Reporting & analytics, Tax & compliance, AI & automation, Accountants, Industry solutions and Developer tools.
- Pricing shows All pricing, or only Free, Freemium, Paid or Free trial apps.
- Sort by ranks results as Most popular (installed by the most businesses), Highest rated (best average rating), Newest (most recently published) or Name (A to Z).
- With no search or filter applied, a Featured row of apps chosen by OneBooks sits above All apps.
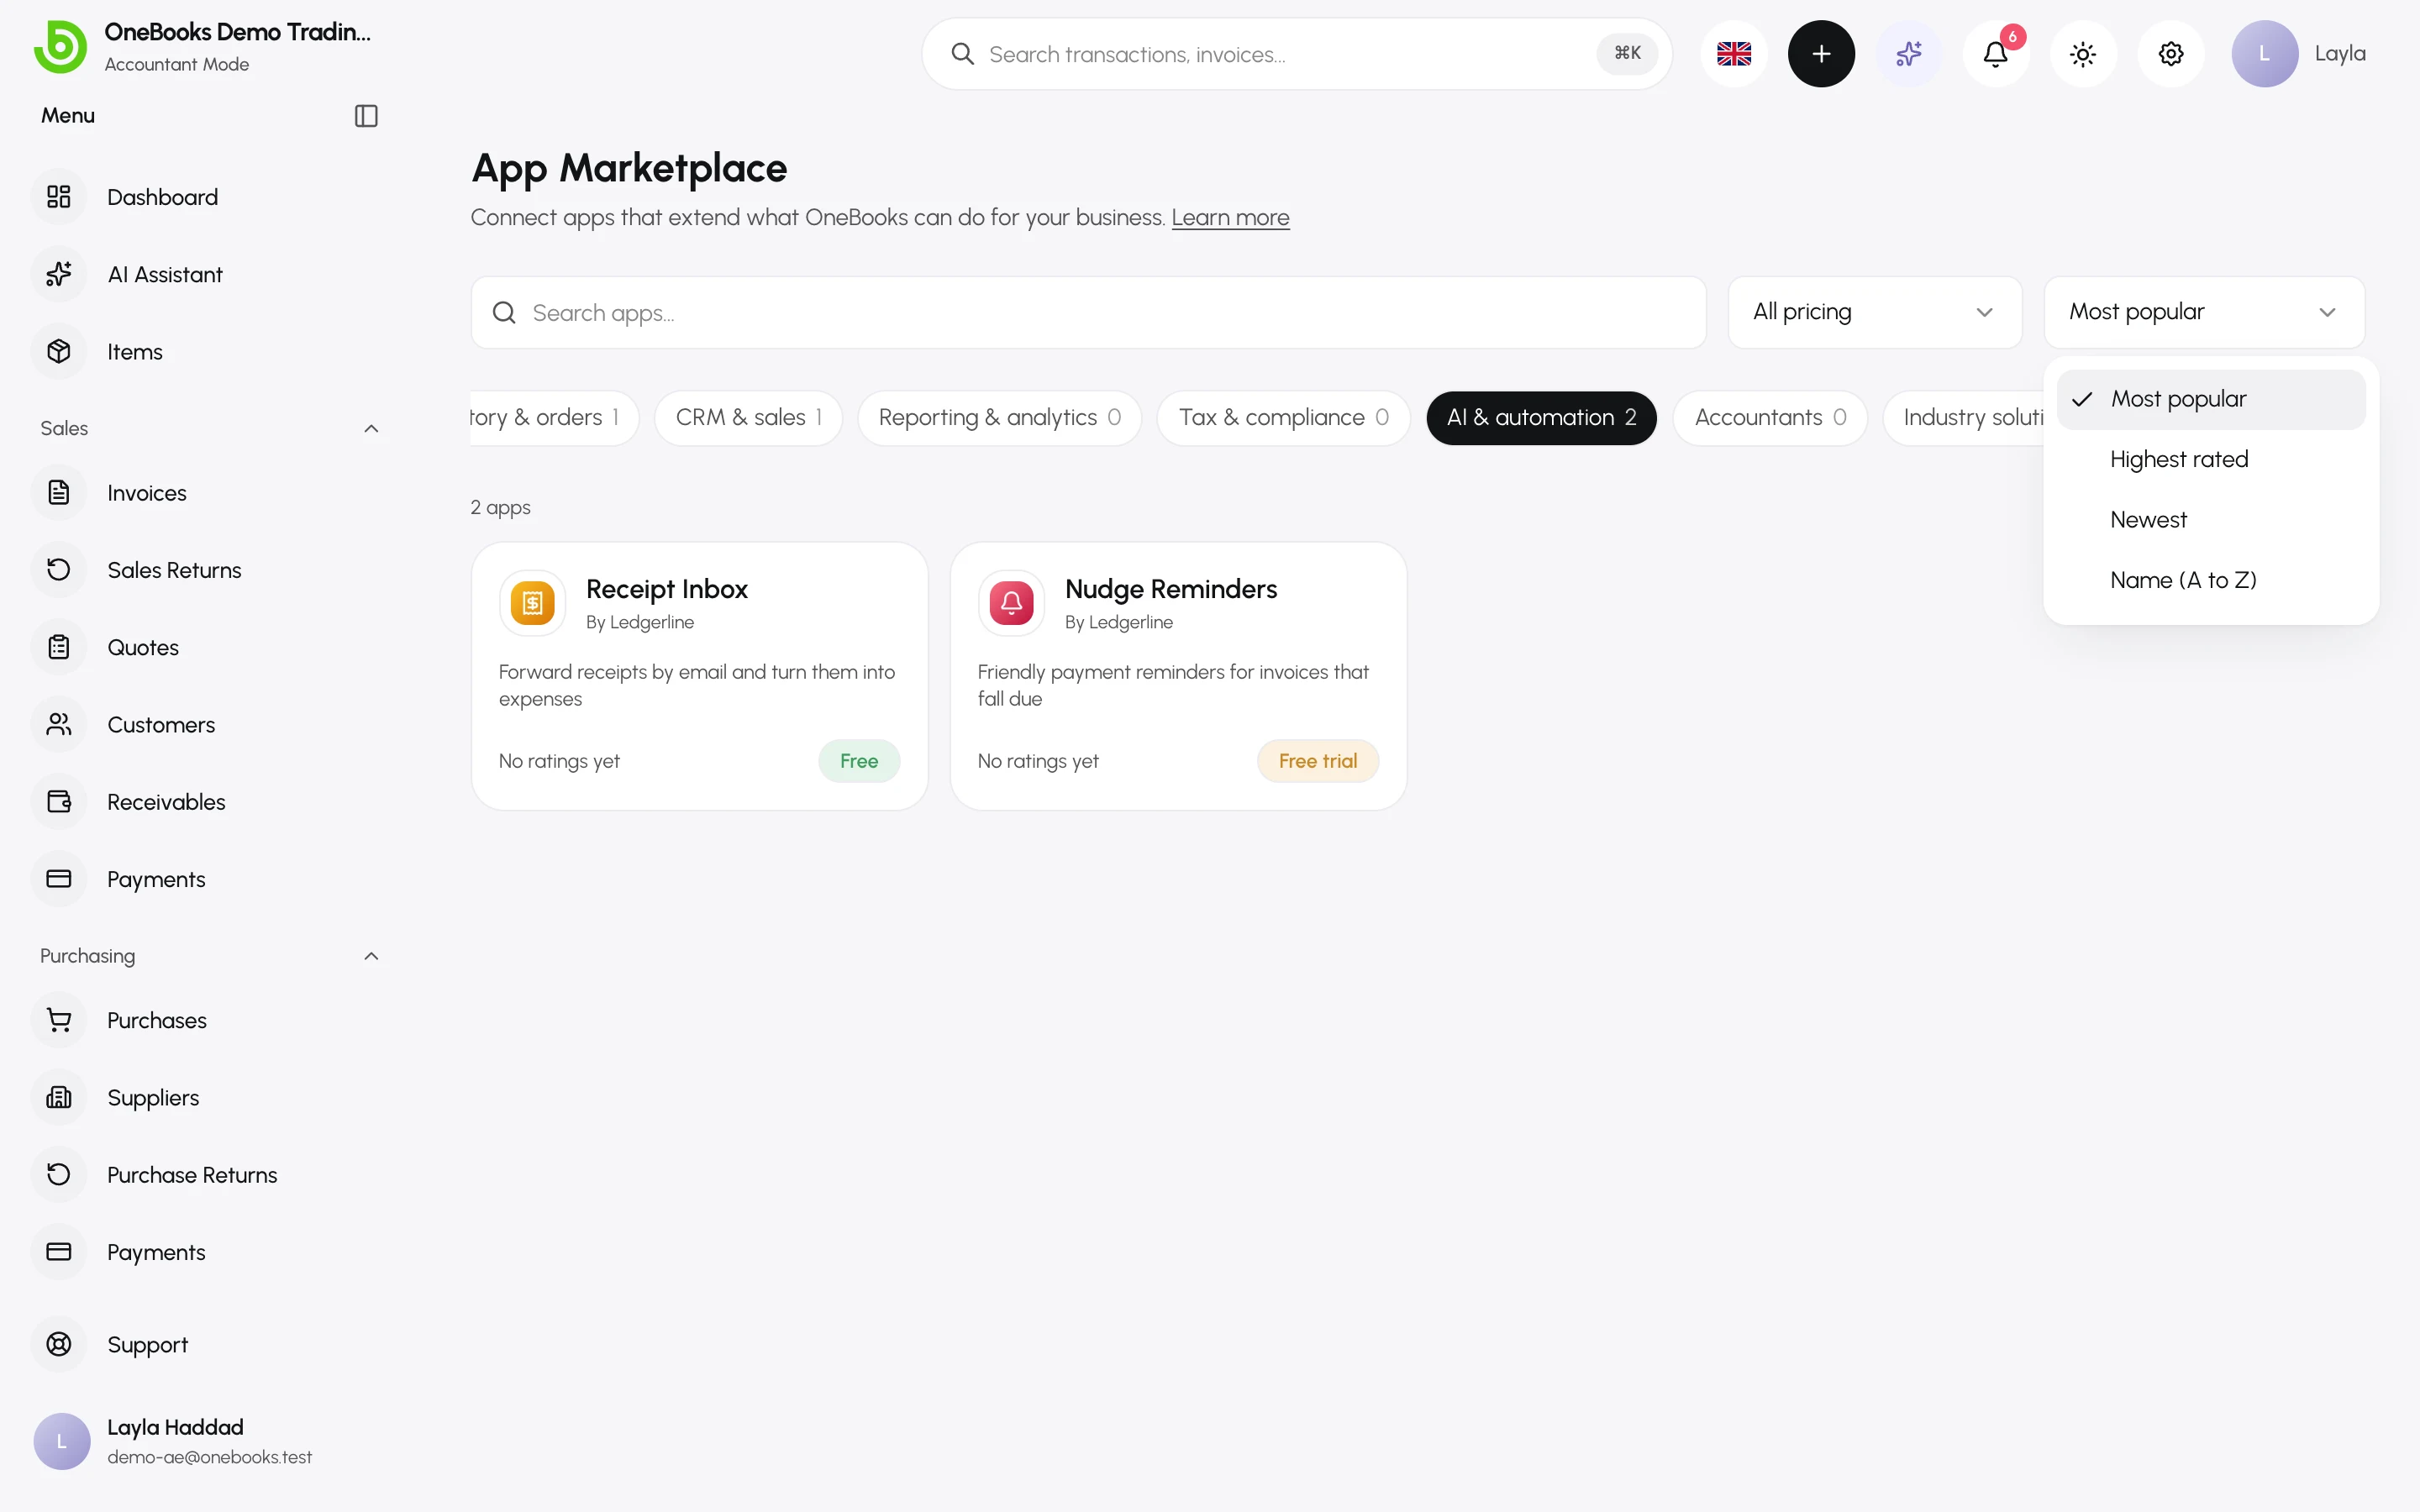
Results arrive 24 at a time; select Load more for the next set. When nothing matches you see No apps match your filters — select Clear filters to start again.
Pricing labels
Section titled “Pricing labels”| Label | What it means |
|---|---|
| Free | The app costs nothing to use. |
| Freemium | Free to start, with paid features or tiers. |
| Paid | You pay the developer to use it. |
| Free trial | Free for a trial period, then paid. |
The listing’s Pricing section, when the developer adds one, gives the actual prices. OneBooks never charges for installing an app, on any plan: an app that isn’t free bills you directly, under the developer’s own terms, and OneBooks takes no payment for it.
Read an app’s listing
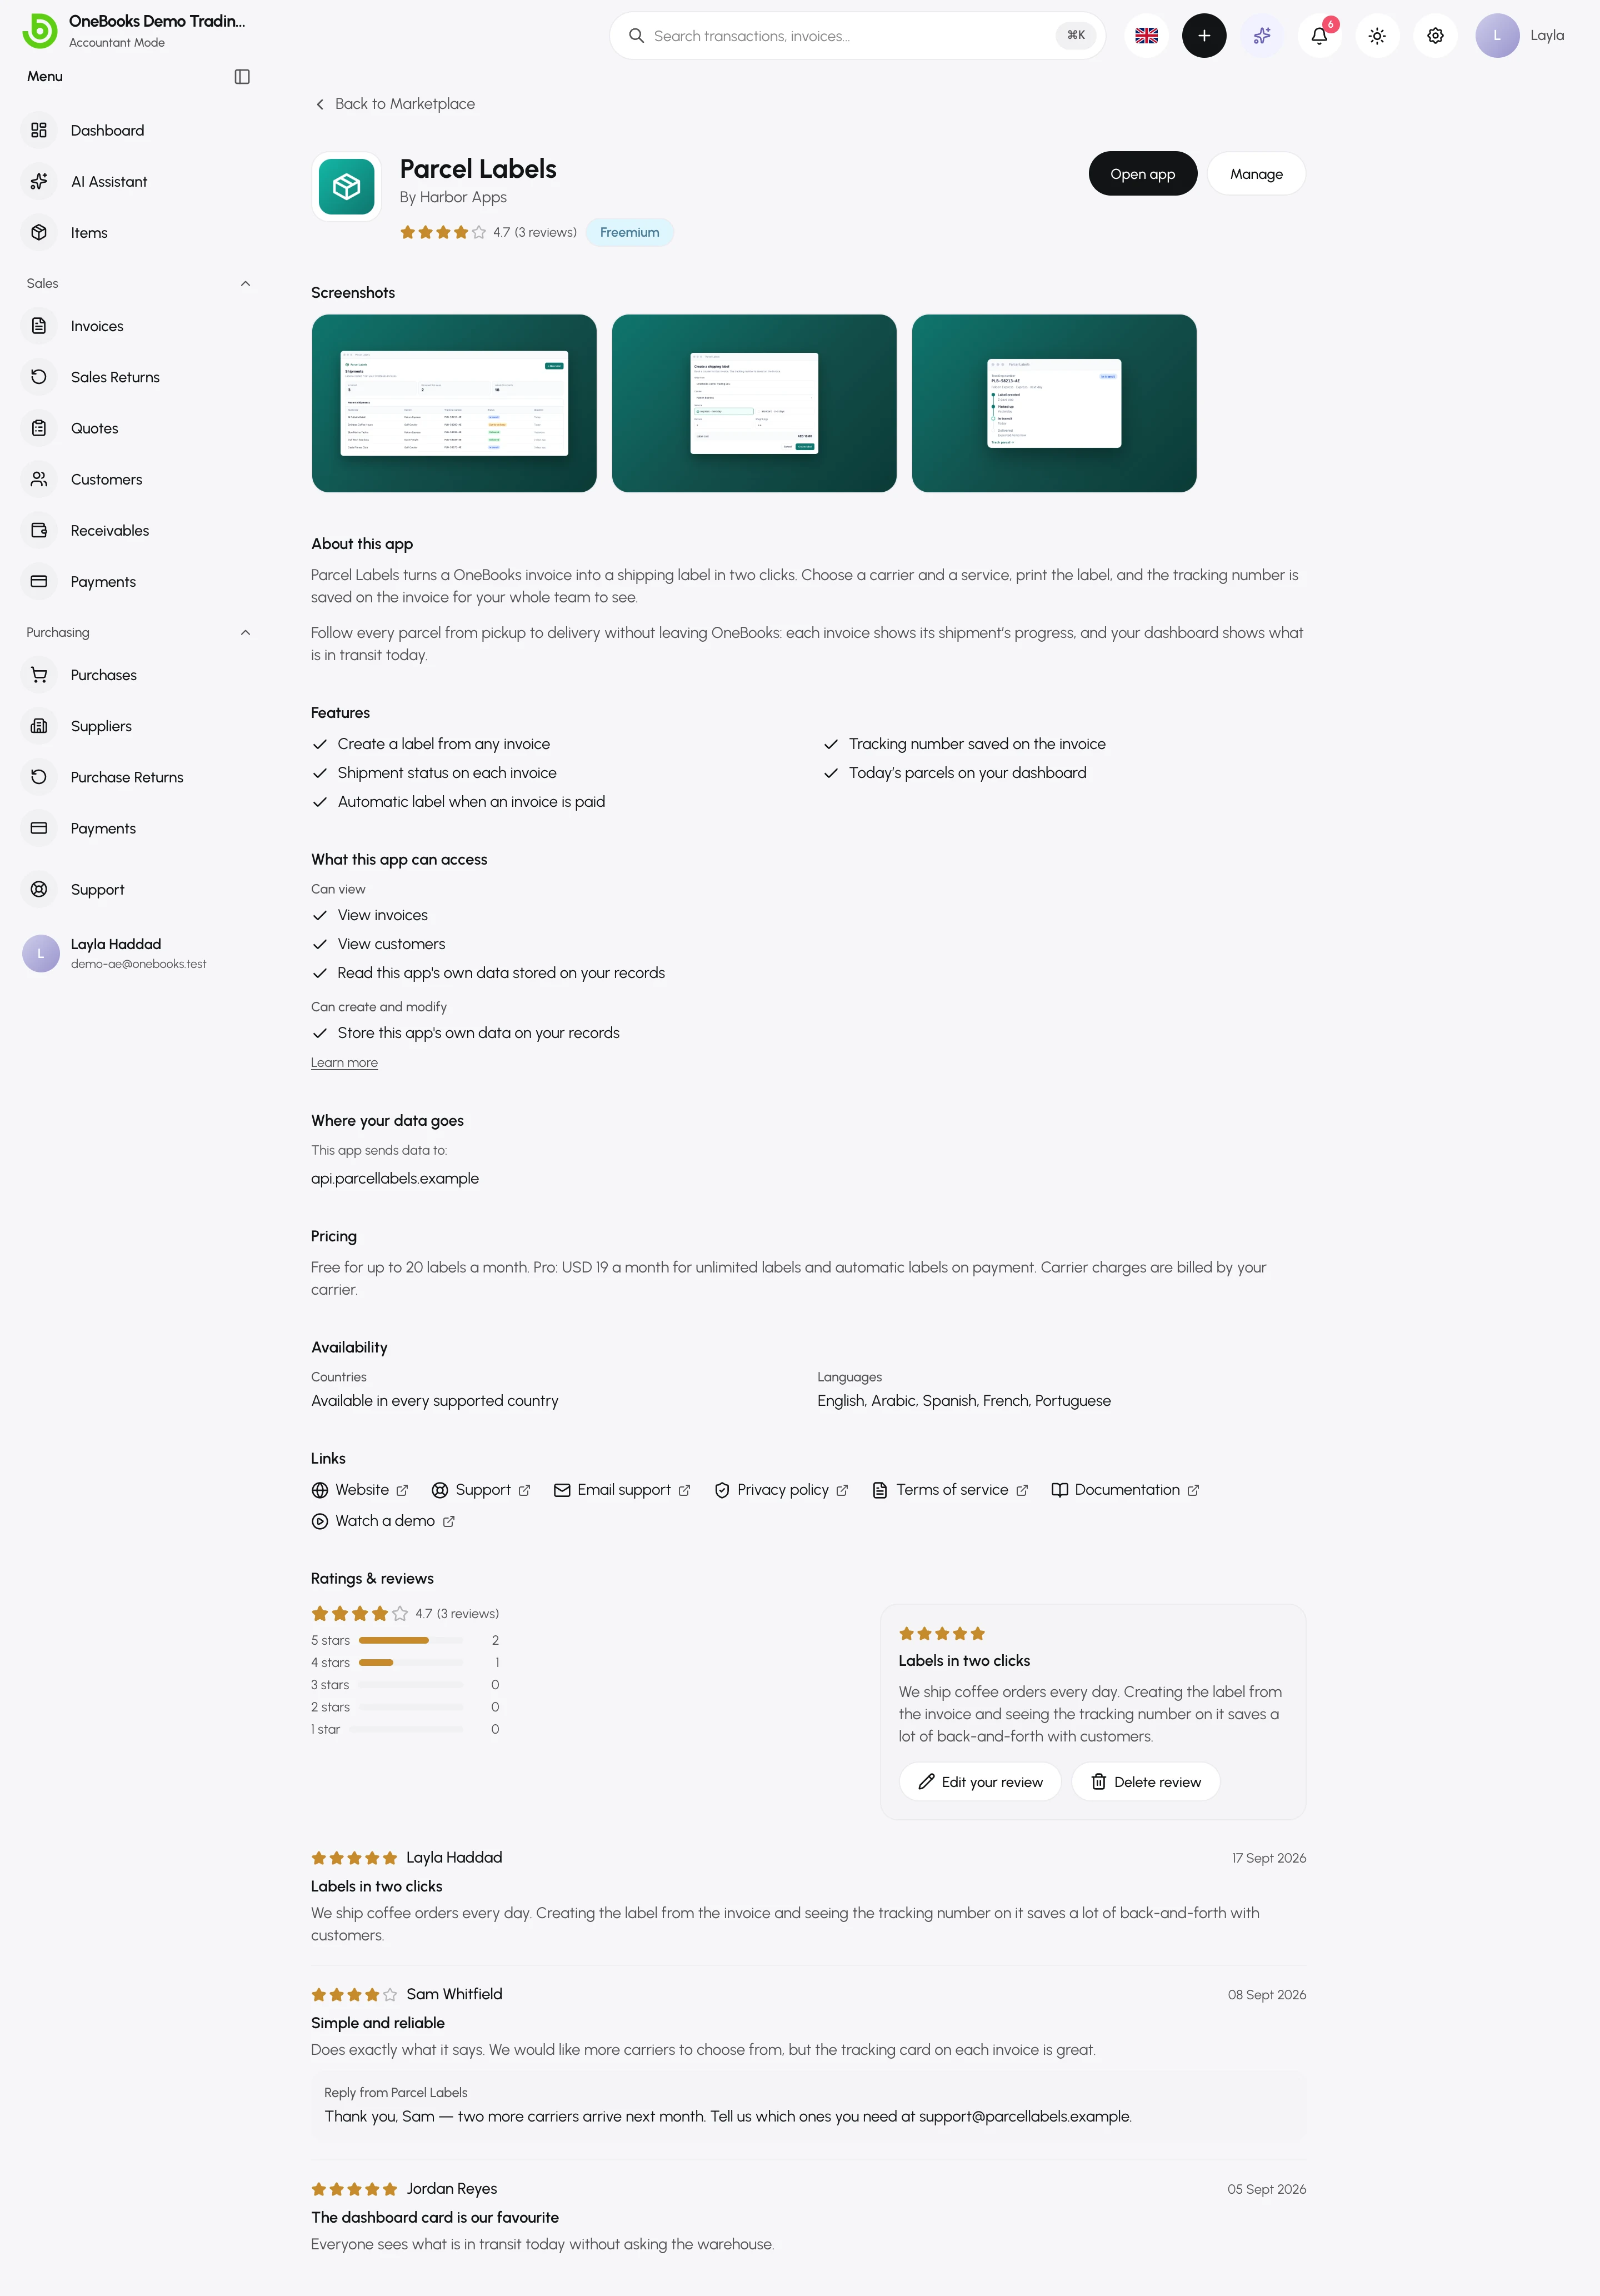
Section titled “Read an app’s listing”Select a card to open the app’s listing. The top of the page shows the app’s icon and name, By and the developer, its star rating with the number of reviews, and its pricing label. Next to them is Install — or, once your business has the app, Open app (for apps with their own screen) and Manage. Without the permission to install apps you see Ask an admin to install this app.; with it, an app that can’t be installed at the moment shows This app can’t be installed right now. Back to Marketplace returns to your results.
Further down are Screenshots (select one to enlarge it, then move through them with Previous screenshot and Next screenshot), About this app and Features.
Permissions and data destinations
Section titled “Permissions and data destinations”What this app can access lists every permission the app asks for, in plain words, grouped into Can view, Can create and modify and Other access — for example View invoices or Create and modify customers. This is exactly what your business grants when it installs the app, so read it before you install. Learn more under the list opens Apps, security and privacy.
Where your data goes appears only for apps whose hosted automations — small programs that run on their own when something happens in your books — can send data outside OneBooks. Under This app sends data to: it lists the outside destinations the developer has declared for those automations. The automations can reach only these destinations and the OneBooks API; a request to anywhere else is blocked. The list always shows the current destinations.
An app that runs on its developer’s own servers also receives whatever it reads through its permissions. How the developer stores and uses that data is set out in the Privacy policy among the listing’s links.
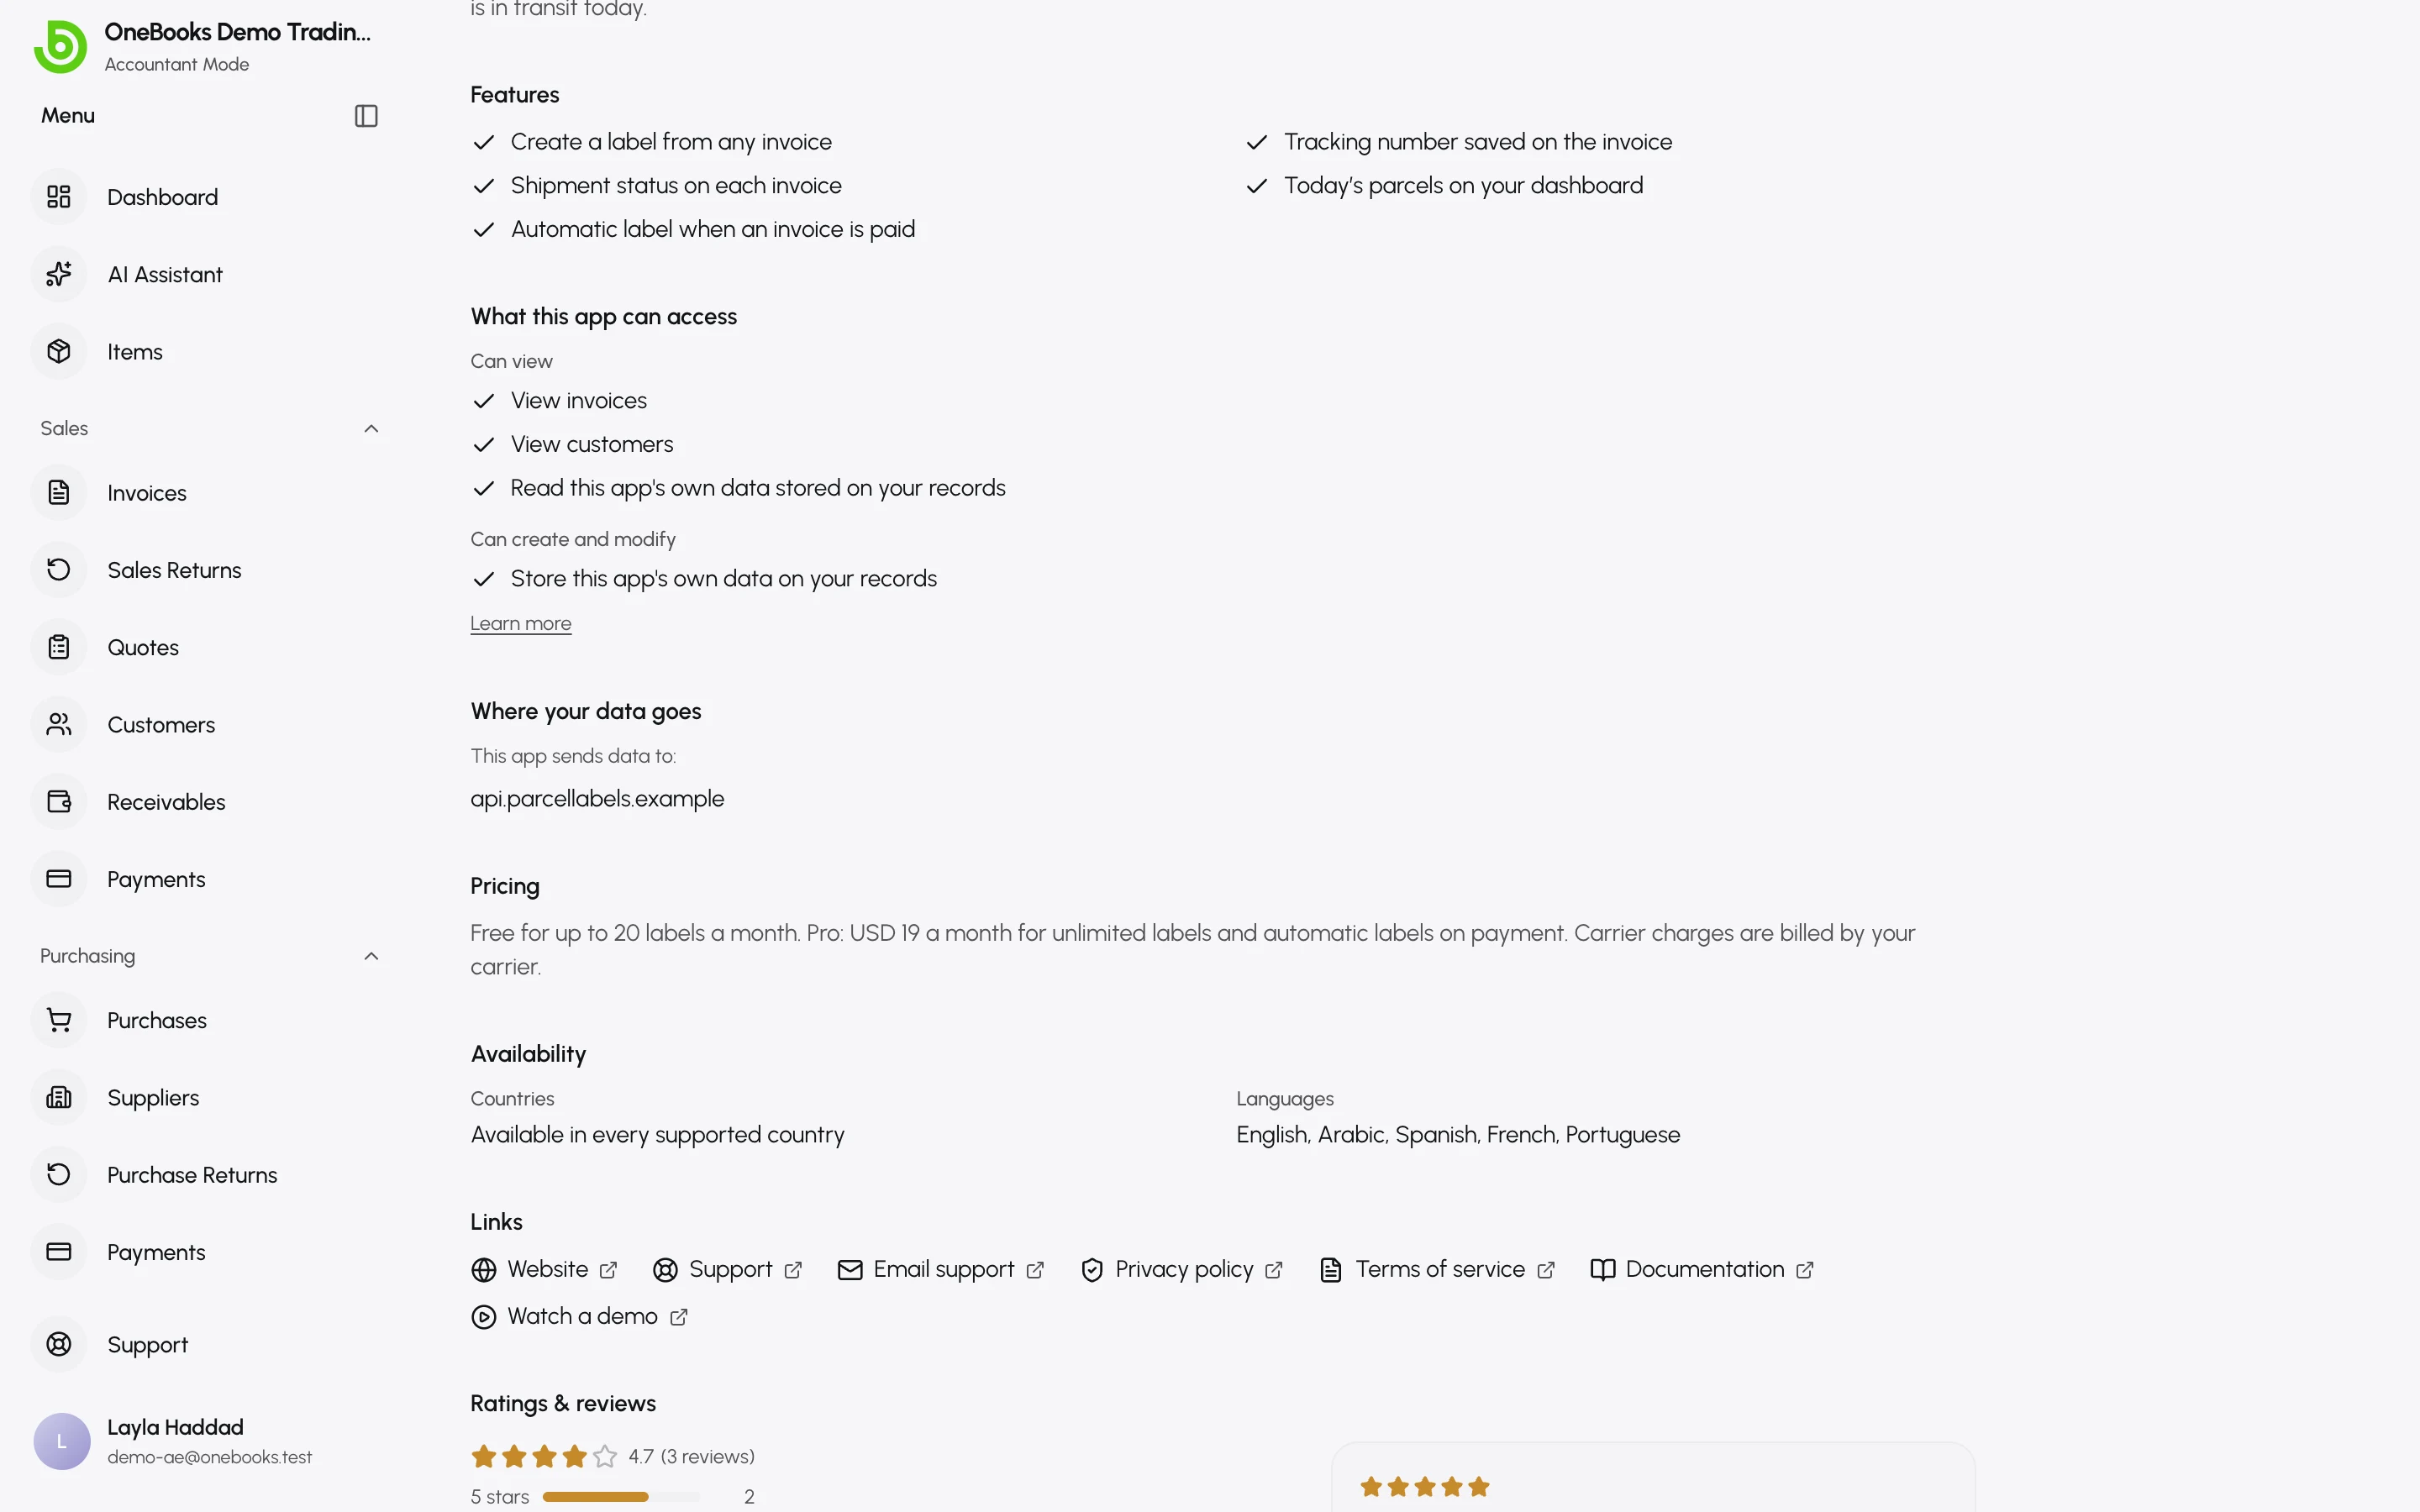
Pricing, availability and links
Section titled “Pricing, availability and links”- Pricing — the developer’s own description of prices and plans, when provided.
- Availability — Countries where the app is offered (Available in every supported country when it isn’t limited) and Languages the app itself supports.
- Links — Website, Privacy policy and Terms of service on every listing, plus Support, Email support, Documentation and Watch a demo when the developer provides them. Links open the developer’s own pages in a new tab; Email support starts an email.
- Ratings & reviews — see Rate and review below.
Install an app
Section titled “Install an app”Select Install on the app’s listing. OneBooks installs an app in one of two ways, depending on how the developer built it — you don’t have to choose.
Apps that install inside OneBooks
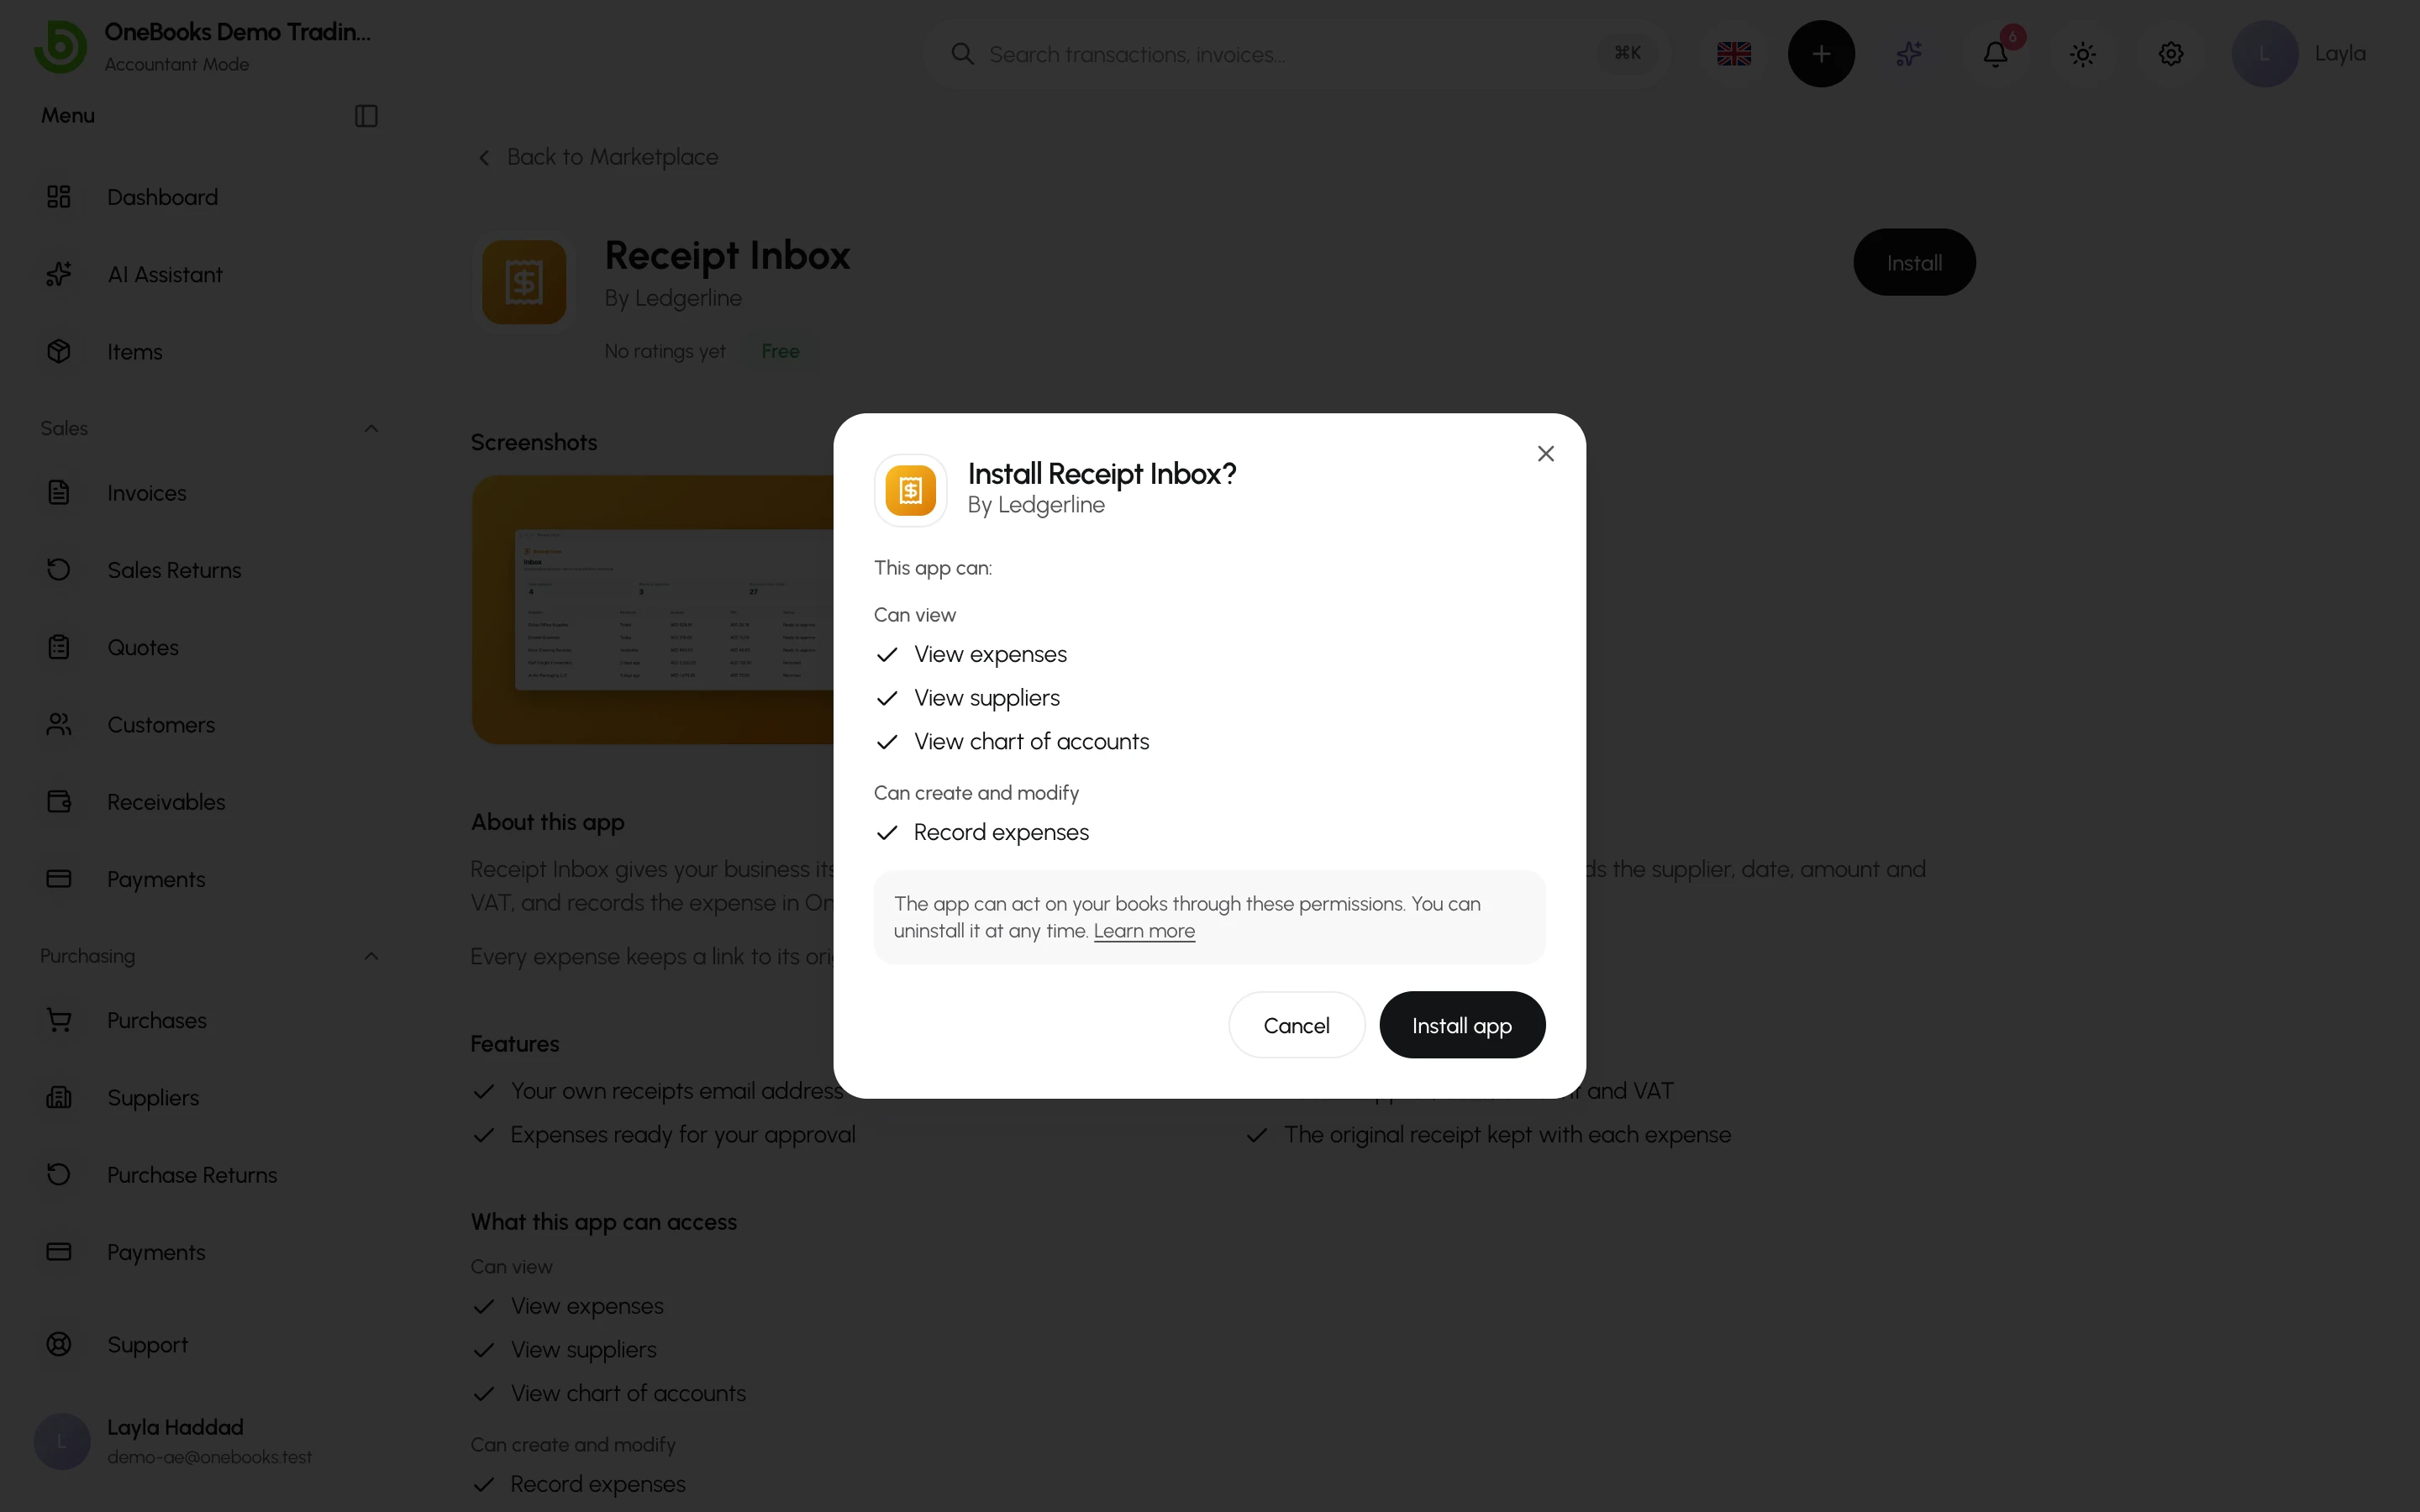
Section titled “Apps that install inside OneBooks”- Select Install. A dialog, Install app name?, shows the app’s icon, name and developer and, under This app can:, every permission it will receive.
- Read the note: the app can act on your books through these permissions, and you can uninstall it at any time. Select Install app to go ahead, or Cancel.
- OneBooks connects the app at once, confirms that it’s installed and opens the app’s own page. The app is now listed in Apps → Installed apps and has its own row under Apps in the sidebar.
Apps that install on the developer’s site
Section titled “Apps that install on the developer’s site”Some apps finish installing on their developer’s website — usually because you also need an account with the developer.
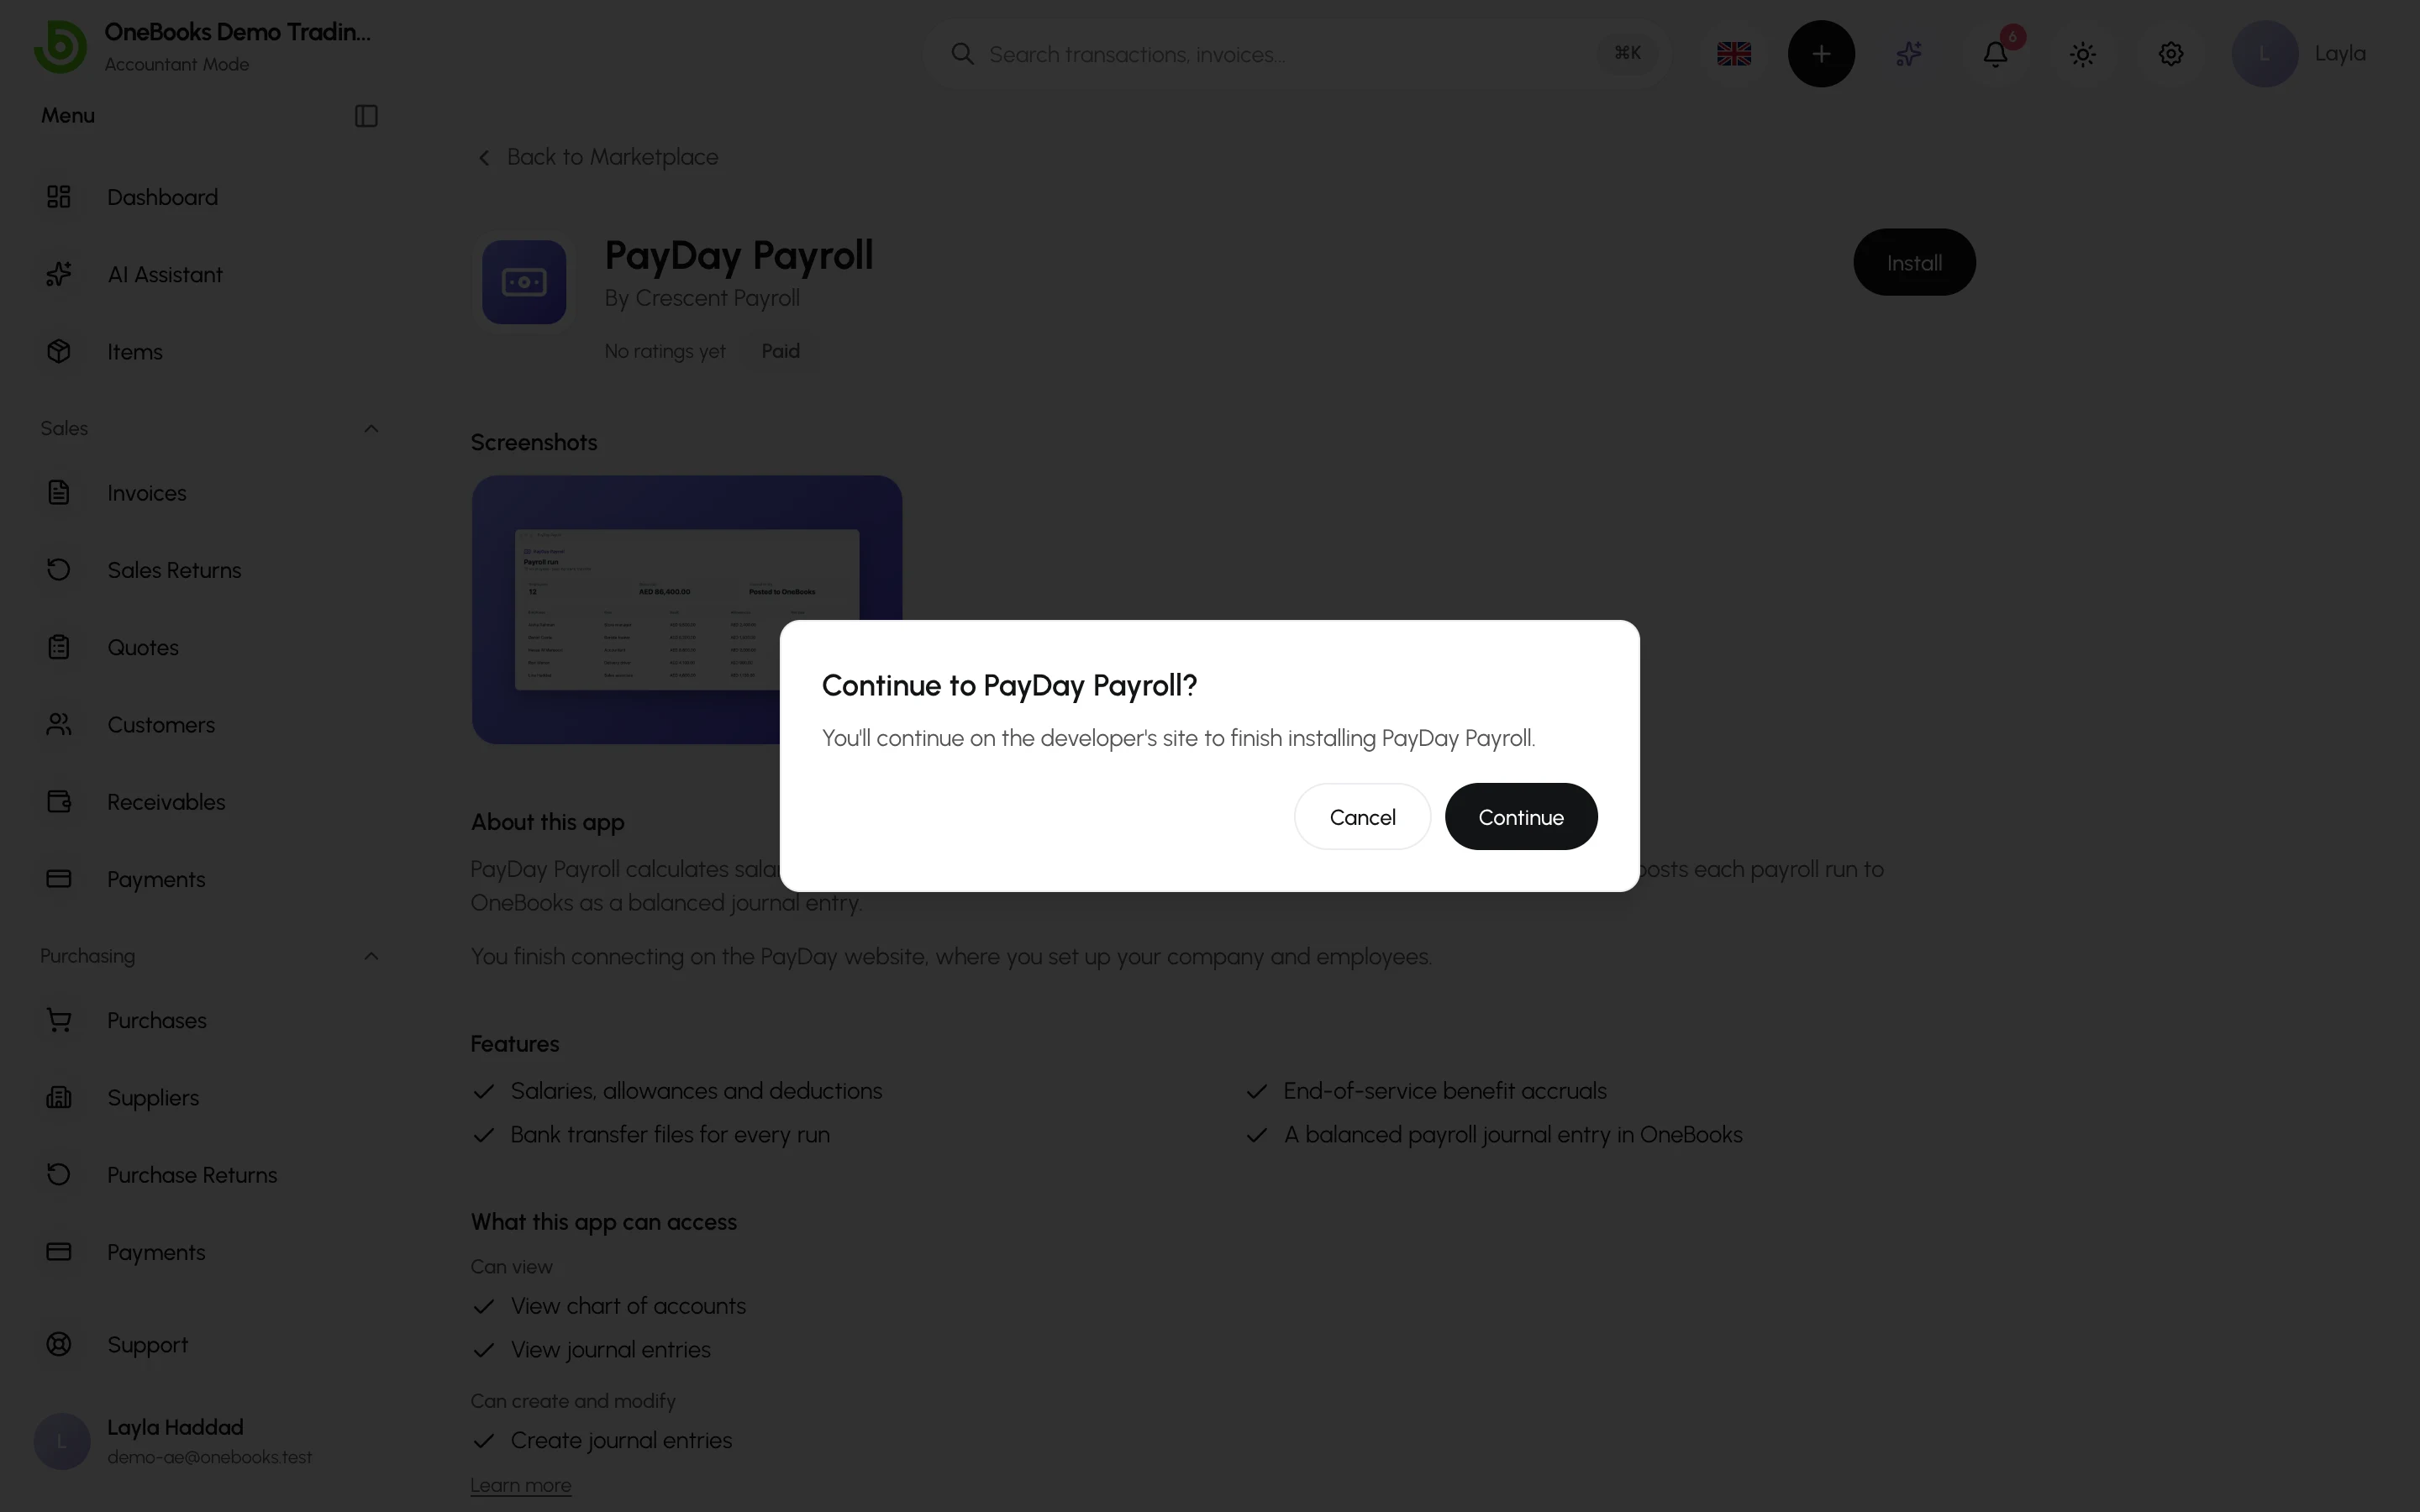
- Select Install. OneBooks asks Continue to app name? — you’ll continue on the developer’s site to finish installing.
- Select Continue and follow the developer’s steps, such as signing in to your account with them.
- The developer sends you back to OneBooks’ own consent screen, Authorize app name, which lists the permissions the app wants and the business it will connect to. Check both, then select Approve — or Deny to stop.
- As soon as you approve, the app appears in Apps → Installed apps.
After you install
Section titled “After you install”- An app with its own screen opens from its row under Apps in the sidebar, or with Open app.
- Apps can add actions and cards to your invoices, customers and other records, and cards to your dashboard.
- Apps → Installed apps shows what each app can access and has done, and is where you uninstall it.
All of this is covered in Manage installed apps.
Rate and review
Section titled “Rate and review”Reviews come from businesses that use the app. Your business can review an app once it has installed it — even if it has uninstalled it since. Each business leaves one review per app, which anyone in the business with the integrations.manage permission can write, edit or delete.
Write a review
Section titled “Write a review”- Open the app’s listing and scroll to Ratings & reviews.
- Select Write a review.
- Choose Your rating, from 1 to 5 stars.
- If you like, add a Title (optional) of up to 80 characters. Then write the Review itself — at least 10 characters, up to 2,000.
- Select Post review.
The review appears at the top of the list, with your name and the date.
Edit or delete your review
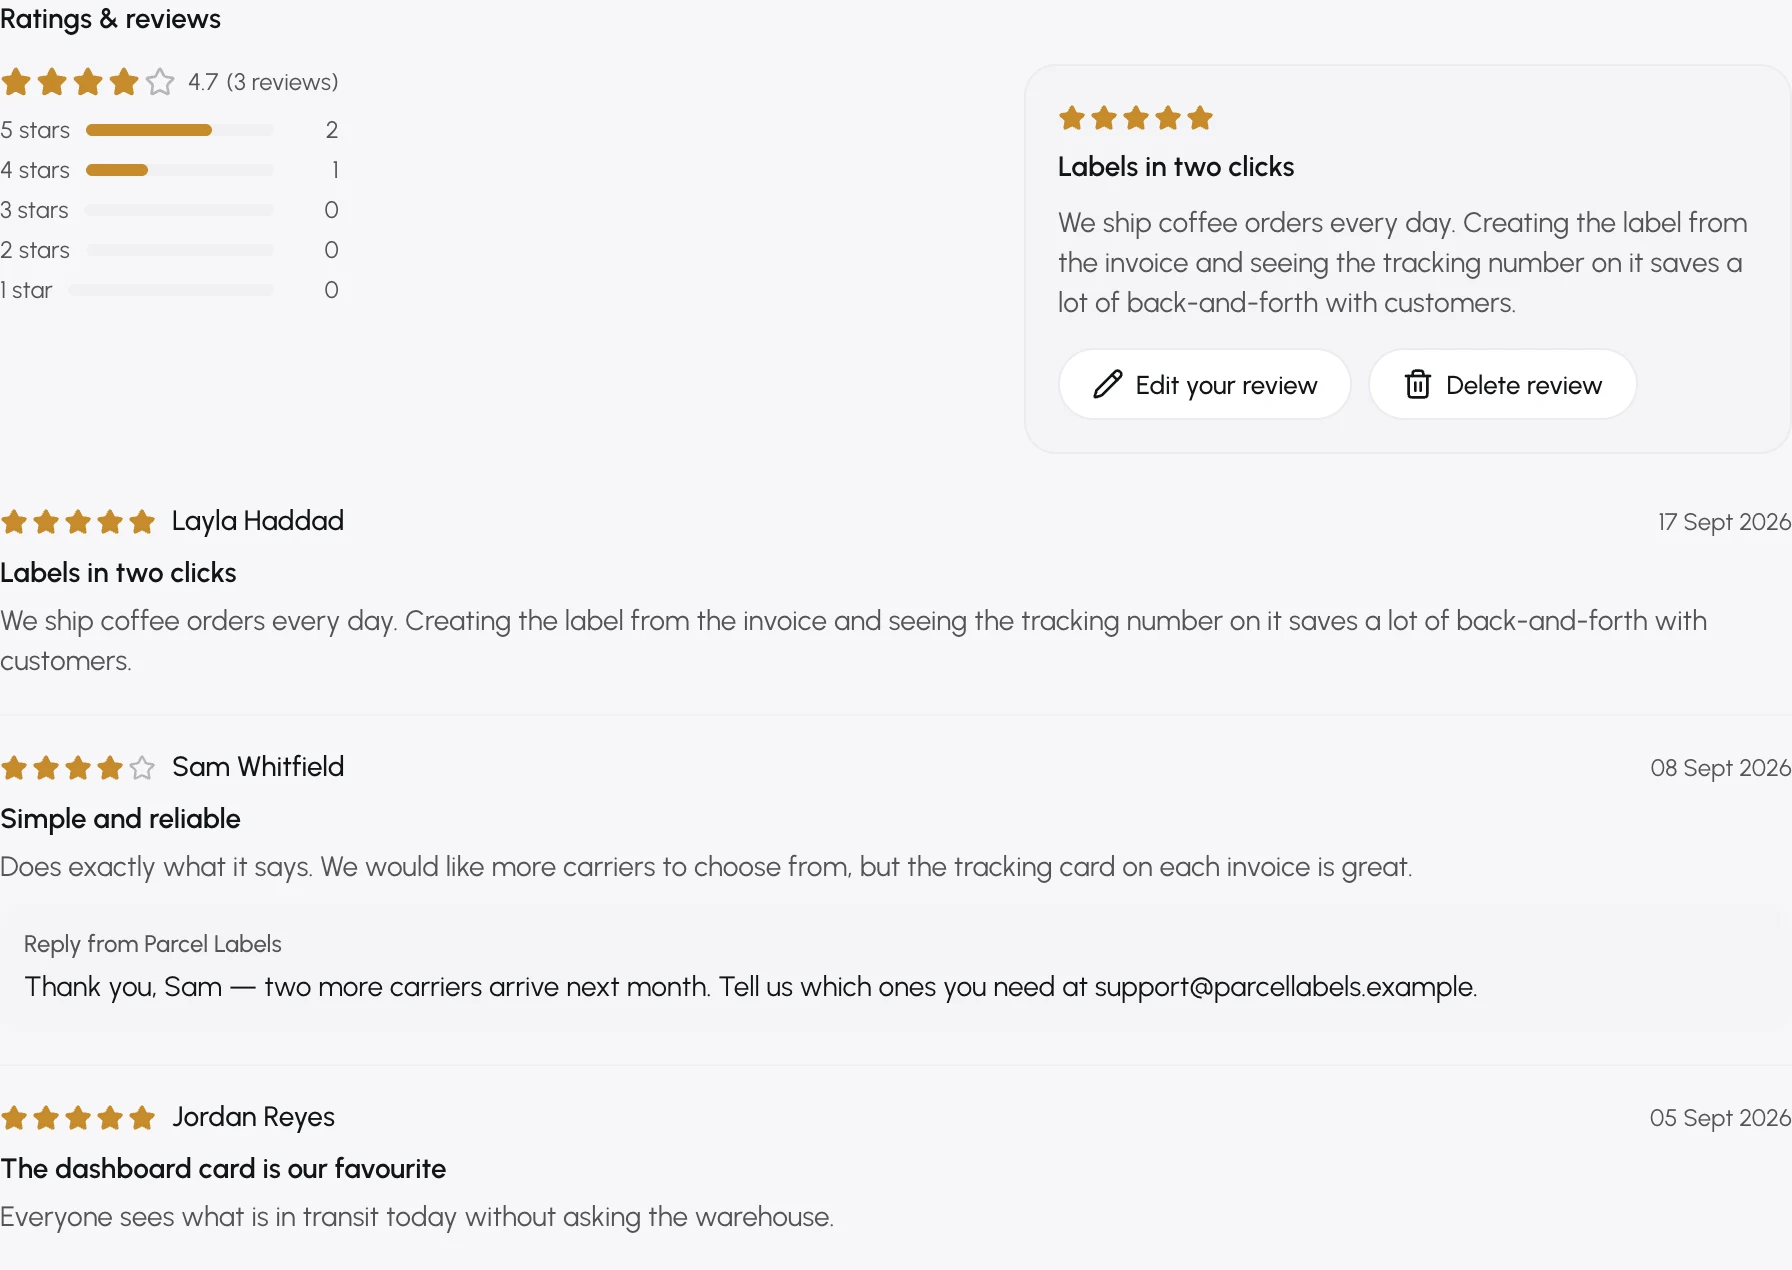
Section titled “Edit or delete your review”Your business’s review sits in its own box next to the rating summary. Select Edit your review, make your changes and select Update review. To remove it, select Delete review, then Delete in the Delete your review? prompt — this removes your rating and review from the app’s page.
Developer replies and moderation
Section titled “Developer replies and moderation”- The developer can post a public reply, shown under the review as Reply from app name.
- The summary at the top of Ratings & reviews shows the average rating, the number of reviews and a bar for each star level.
- OneBooks moderates reviews. A review it hides disappears from the listing and no longer counts towards the rating.